CDE2310 Group 1 — AMR for Smart Warehouse Intralogistics
System documentation for the autonomous mobile robot (TurtleBot3 Burger) designed for smart warehouse intralogistics.
🔗 Navigation
- Home
- Requirements
- Con-Ops
- High Level Design
- Interface Control Documents
- Software Development
- Testing
- Bill-Of-Materials
- Electrical Subsystem
- Mechanical Subsystem
- Improvements
- User Manual ← You are here
User Manual
1. System Overview
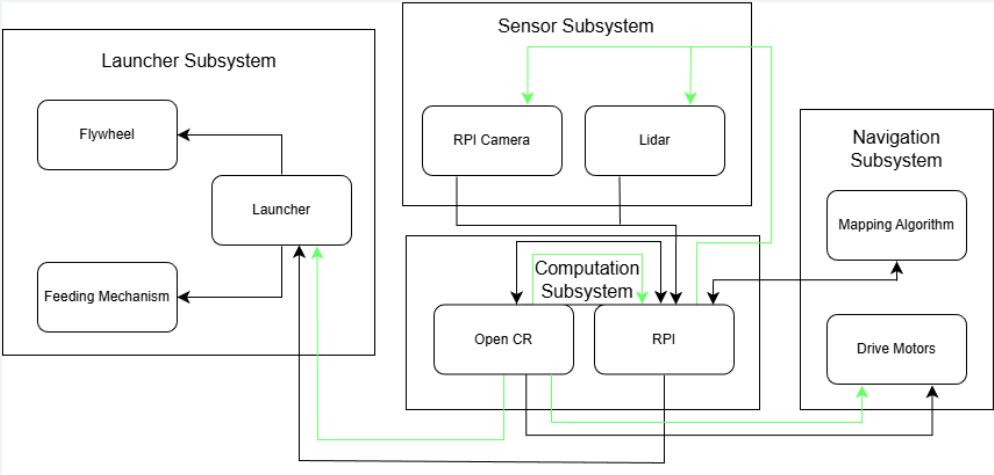 System architecture overview.
The Group 1 AMR is a TurtleBot3 Burger-based autonomous mobile robot with a custom launcher payload. Its mission is to autonomously navigate an unknown warehouse maze, detect ArUco-marked delivery stations, and deliver ping pong balls into static and oscillating receptacles — all within a 25-minute window with no human teleoperation.
| Parameter | Value |
|---|---|
| Platform | TurtleBot3 Burger + custom payload |
| Total Mass | 1402.24 g (1.40 kg) |
| Dimensions (L × W × H) | 138 mm × 178 mm × 192 mm |
| Battery | Li-Po 11.1V, 1800 mAh |
| Compute | Raspberry Pi 4B + OpenCR 1.0 |
| Sensors | LDS-02 LiDAR, RPi Camera V2 (8 MP) |
| Launcher | Dual counter-rotating flywheels + SG90 servo gate |
| Ball Capacity | 9 ping pong balls |
| Mission Window | 25 minutes |
| Estimated Runs per Charge | ~4–5 |
2. Prerequisites
2.1 Mechanical and Electrical Setup
The mechanical and electrical is assumed to be complete. However a detailed explanation is provided for configuring the electrical subsystems and attaching the ball-launching mechanisms onto a standard, unmodified Turtlebot3.
2.2 Software Environment
A ROS 2 Humble environment must be installed on the operator’s laptop. Follow the setup process at: https://emanual.robotis.com/docs/en/platform/turtlebot3/quick-start/#pc-setup
2.3 Software Installation
- Back up and remove your existing ROS 2 src folder:
cp ~/[YOUR_ROS2_WORKSPACE]/src ~/[YOUR_DESIRED_BACKUP_PATH]
rm -rf ~/[YOUR_ROS2_WORKSPACE]/src
- Clone the Group 1 repository into your ROS 2 workspace:
git clone https://github.com/Russell501/CDE2310_Group1.git
- Install ROS 2 dependencies and rebuild the workspace:
rosdep install --from-paths src --ignore-src -r -y
colcon build --symlink-install
source install/setup.bash
3. Pre-Mission Setup
3.1 Physical Setup
- Ensure the battery is fully charged (11.1V LiPo, 1800 mAh).
- Verify all frame layers and the launcher payload are securely fastened.
- Confirm the LiDAR has an unobstructed 360° field of view.
- Load 9 ping pong balls into the gravity-feed storage tube; verify they feed freely.
- Confirm the flywheel motors spin freely and the SG90 servo gate cycles without jamming.
- Verify all wiring connections are secure (soldered connections preferred over jumper wires).
- Check that the RPi Camera is properly connected via the CSI flat flex cable.
3.2 Pre-Flight Integration Test
Before running the full mission, execute the system integration test to verify all components:
- On the RPi (via SSH): start
ball_launcher.pyandaruco_live.py. - On the RPi: start the SLAM and Nav2 stack.
- Point the camera at an ArUco marker.
- On the laptop: run
python3 system_test.py. - All 8 tests should pass (the test will fire one real ball during test #7).
3.3 Individual Component & Docking Tests
If specific subsystems need to be verified in isolation, use the following standalone test scripts. All RPi scripts should be run via SSH on the TurtleBot; local scripts should be run on the operator’s laptop.
1. Test Flywheels
Spins up the flywheel motors to verify both are operational and spinning at matched speeds.
# Copy the script from software/docking/rpi
# On RPi (via SSH):
python3 ball_launcher_test.py
2. Test Servo
Cycles the SG90 servo through its range to verify the feeder gate mechanism is responding to PWM signals.
# Copy the script from software/docking/rpi
# On RPi (via SSH):
python3 servo.py
3. Test Station A Docking & Launching (Full Sequence)
Runs the complete Station A sequence: ArUco detection, approach, docking alignment, and ball firing.
# On laptop:
python3 software/docking/local/aruco_dock_and_launch_test.py
4. Test Docking Only
Runs the docking approach sequence (ArUco detection and alignment) without firing any balls.
# On laptop:
python3 software/docking/local/aruco_dock_test.py
5. Test Station B Launching
Tests the Station B firing sequence, which synchronises ball launches with the moving receptacle.
# On laptop:
python3 software/docking/local/station_b_launcher.py
4. Mission Deployment
Step 1 — Power On
Turn on the TurtleBot3 Burger. Wait for the Raspberry Pi to boot (indicated by the green LED activity on the Pi).
Step 2 — SSH into the RPi
Open a terminal on your laptop and SSH into the TurtleBot3:
ssh ubuntu@[TURTLEBOT_IP]
Step 3 — Start RPi Processes
In the SSH terminal, run the RPi launch script:
python3 main_launch.py
This starts the ArUco detection pipeline (aruco_live.py) and the launcher hardware controller (ball_launcher.py).
Step 4 — Start Mission GUI
In a new terminal on your laptop:
ros2 run auto_nav mission_gui
This opens the Tkinter-based mission monitoring GUI showing real-time phase status, marker detections, and delivery logs.
Step 5 — Launch the Mission
In another terminal on your laptop:
ros2 launch auto_nav bringup_all.launch.py
This starts the mission in dependency order:
- Cartographer begins SLAM mapping.
- Nav2 starts when Cartographer is ready.
- The mission controller FSM starts when Nav2 is ready.
Step 6 — Monitor
Observe the robot’s progress through:
- RViz2 — Live map, robot pose, planned paths, costmaps, and marker detections.
- Mission GUI — Current phase, marker status, docking attempts, and ball delivery logs.
- Terminal output — Detailed ROS 2 log messages from each node.
No physical intervention is permitted after the mission starts.
5. Mission Phases (What to Expect)
| Phase | What Happens | Approximate Duration |
|---|---|---|
| Boot & Init | SLAM starts mapping, Nav2 initialises | 1–2 min |
| Exploration | Robot explores the maze autonomously, detects station markers | 5–12 min |
| Station A | Robot docks at the static station and fires 3 balls with timed delays | 2–4 min |
| Transit | Robot navigates from Station A to Station B | 1–2 min |
| Station B | Robot docks and fires 3 balls synchronised to the moving receptacle | 2–4 min |
| Complete | Mission controller logs completion | < 1 min |
6. Troubleshooting
6.1 Missing base_link or odom topics in RViz2
Wait at least 30 seconds for the topics to be published. If still unavailable, terminate the launch files and run them again.
6.2 Servo not moving to fire balls
- Check the logs in the mission GUI for ball launch messages.
- Verify the messages were received in the SSH terminal (
ball_launcher.pyoutput). - If messages are present but servo is not moving, check that all 3 servo wires are connected (signal, power, ground).
6.3 Flywheel(s) not spinning when launching
- Check logs in both the mission GUI and SSH terminal.
- Inspect whether the flywheel disc is rubbing against the top waffle plate; if so, gently press it back down.
- Check all connections: motors → motor driver, motor driver → Raspberry Pi GPIO pins.
6.4 Robot unable to navigate tight spaces
The Nav2 costmap inflation radius may be too conservative. Possible tuning (in burger.yaml):
- Reduce
inflation_radius(currently 0.25 m). - Increase
cost_scaling_factor(currently 1.5). - Consider switching to
SmacPlanner2Dfor better tight-space path planning.
6.5 Erratic odometry or random servo jitter
Suspected cause: power supply noise on the 5V rail from shared peripherals, or unintended PWM signals on the servo GPIO during boot. Mitigations:
- Add a decoupling capacitor on the servo power line.
- Add a pull-down resistor on the servo PWM GPIO pin.
- Manually reposition the servo between runs if jitter is observed.
6.6 Wiring comes loose during operation
Solder all critical connections instead of using jumper wires. Apply heat shrink tubing over exposed wire joints. Minimise female-to-male pin connections on the Raspberry Pi — share 5V and GND on a proto board with soldered joints.
7. Maintenance
7.1 Battery
- Charge the 11.1V 1800 mAh LiPo battery fully before each session.
- Estimated 4–5 full mission runs per charge (3.28 Wh per run, 17.98 Wh total capacity).
- Monitor RPi voltage under load — must remain ≥ 4.75V.
7.2 Mechanical
- Inspect all frame layer screws and standoffs before each run.
- Verify ball storage tube alignment and gravity feed.
- Check flywheel disc clearance from waffle plates.
7.3 Wiring
- Inspect all soldered connections for cold joints or breaks.
- Verify GPIO connections to L298N and servo are secure.
- Ensure signal and power wires are routed separately to minimise EMI.
7.4 Part Replacement Log
| Date | Component | Action / Reason | By |
|---|---|---|---|
| 19/03/2026 | RPi Camera | Camera not working after testing with different RPi and FFC | Russell Ng |
| 07/04/2026 | 11.1V Li-ion Battery | Battery cable broken | Alex |